Summary
This application allows for quick and easy generation of Moodle quiz questions. Once the instructor creates the questions in the spreadsheet, the application enables them to export these questions to an XML document, which they can then import into Moodle. It also allows for the reverse - taking XML documents generated from Moodle and importing them into a spreadsheet for easier viewing, editing, and moving.
To use this application, first enter your categories in the categories tab (this minimizes errors due to a mistype). You then have 2 choices for how to create questions:
Within the menu, select "Add-ons > (QB)² - Question Bank Quick Builder > Add Questions (guided)" to open an interface to guide you through adding questions one at a time.
Within the spreadsheet, use the pull downs to choose the category, question type, and value for each question.
(QB)2 supports the following question types :
Multiple Choice (multichoice)
Short Answer (shortanswer)
True / False (truefalse)
Ordering (ordering)
PoodLL Recording (poodllrecording)
Essay (essay)
Matching (matching)
Cloze (cloze)
Drag & Drop into text (dragdrop, AKA ddwtos)
Missing Words (missingwords, AKA gapselect)
Description (description)
Multiple Answer (multianswer)
Setup
You can install (QB)2 from the G-Suite Marketplace. You can also install directly from the Google Sheet by going to Add-Ons > Get add-ons.
Set up (QB)2 spreadsheet
You can set up the spreadsheet with the blank template automatically by going to "Add-ons > (QB)² - Question Bank Quick Builder > Set up (QB)² spreadsheet". This will create all sheets necessary for (QB)². (QuestionTypes is a hidden sheet that does not need to be edited by the user.) This will also open up an interface to guide you through creating questions in a sidebar to the right of your spreadsheet.
This does not delete any pre-existing sheets except for those with the same names, so please exercise caution and make sure there are no existing sheets called “Question Bank”, “Categories”, or “QuestionTypes”. Set up is not intended to replace your existing questions and categories, but you may lose some content if originally formatted incorrectly.
Another alternative is to save a copy of one of the files below in your Google Drive. To make a copy, open the file and choose: File > Make a copy. Both links can be accessed from "Add-ons > (QB)² - Question Bank Quick Builder > Documentation & Template".
(QB)² Spreadsheet Template - Samples (Recommended for first time users)
(QB)2 Spreadsheet Template - Blank
Finally, it is possible to make use of our Microsoft Excel template and add questions offline. Instructions are available at (QB)² - Writing Questions in Excel.
Your spreadsheet and (QB)2 are now ready to be used.
How to Use
Question Bank is the sheet that will hold all of your questions.
The Categories sheet can be edited to include your categories. This will then populate the categories drop down on the “Question Bank” sheet.
Add Questions (guided)
The easiest way to create questions is to select select "Add-ons > (QB)² - Question Bank Quick Builder > Add Questions (guided)" from the menu. This will display an interface on the right-hand side of the screen for adding questions.

Choose the desired question type from the dropdown menu at the top. The interface will adjust itself based on your choice.
Next select a category from the new dropdown menu.
If you have changed your categories since opening the interface, you will need to click Refresh first.
Then, add your question.
Depending on the question type, you may be prompted for answer choices and scores.
You may also indicate here that a question will need media added within Moodle. This will add the text "[MEDIA]" to the title of the question, letting you see at a glance which questions need editing in Moodle.
You may change question types using the dropdown menu at the top of the interface at any time. Doing so will preserve your category selection and question text but will not preserve your answers, if any.
When you are done, click the Add button to insert your question into the spreadsheet. This will show the row your question was added to, in case you wish to edit it later. The interface will prepare for adding a new question.
Clicking the Reset button will revert the interface to its initial state, erasing any category, question, and answer choices currently displaying in it. Questions already added to your spreadsheet will remain unchanged.
Fields
Below is a brief description of each column on the sheet
Category – this is fed from the Categories tab. Categories are the main way Moodle organizes questions within a question bank. Enter your category here, and use the pull down arrow in the Question Bank tab to choose the category you want to place the question in. If you specify a category, all subsequent rows will fit into that category until a new one is entered. Upon adding your questions to Moodle, if the category does not yet exist, it will be created automatically.
Forward slash ( / ) can be used in the category column to specify sub-categories
Type – this is fed from the hidden QuestionTypes tab and is pre-populated with the question types (QB)2 supports. These are the types of questions from which you can choose.
The type of question chosen will automatically change the Value/Group/Answer format for that question
Question/Description – the actual question the student responds to.
Value/Group/Answer – This is a multipurpose field.
Upon adding question to Moodle, the answer choices will be randomized by default.
Currently accommodates up to 6 responses. Format of this field will change (drop down or free text) depending on the question type selected.
Value is the percentage (fraction) of points that the response will earn.
If you desire to give partial credit for an answer, the fraction column to the right of the answer can be adjusted accordingly.
Example: 100 = full credit, 50 = half credit, 0 = none. These are tied directly to the answer to the left of each fraction column.
Group allows for answer option groupings, for question types like dragdrop and missingwords.
Answer is mainly used for matching question type where the correct answer is set
Question Types
Multiple Choice:
One answer should be the correct one; set value to 100.
The rest of the answers can be set to 0 or partial values such as 25 or 50 depending on if you want to allow partial credit for some answers.
Short Answer:
One answer should be the correct one; set value to 100.
The rest of the answers can be set to 0 or partial values such as 25 or 50 depending on if you want to allow partial credit for wrong answers.
True / False:
Only answer options should be TRUE and FALSE
One fraction has to be set to 100 and the other 0
Ordering:
Place answers in correct order
Value/Group/Answers do not need to be set for any answer
Default grading of answers is set to Absolute Position
PoodLL Recording:
Value/Group/Answers do not need to be set
Essay:
Value/Group/Answers do not need to be set
Matching:
The correct matching answer option needs to be set in each Value/Group/Answer field to the right of each Answer column
Drag & Drop into Text:
Groups of answer choices need to be set for each blank in the Question/Description, associated with a number. (Ex: For every [[1]] there’s a [[2]].)
The first answer per Group to appear from left to right will be considered the correct answer
Missing Words:
Groups of answer choices need to be set for each blank in the question, associated with a number. See previous for example of Question/Description format.
The first answer per Group to appear from left to right will be considered the correct answer
Cloze:
Question and answers are to be written in the Question/Description column.
Answers are indicated between 2 carets (^) or double square brackets ([[ and ]]).
Multichoice: write out the options separated by a comma, the first listed is the correct answer (ex: Phoenix: ^Arizona, California^ Sacramento [[California, Arizona]] )
Shortanswer: write out the answer between the two carets (^) or double square brackets ([[ and ]]). This is not case sensitive (ex: the capital of France is ^Paris^ and the capital of Germany is [[Berlin]].)
Value/Group/Answers do not need to be set
Description:
Value/Group/Answers do not need to be set
Multiple Answer
Used similarly to multiple choice but, At least one answer needs to be correct, and the total point values of all the correct answers need to add up to 100
Feedback
(QB)² supports adding answer-level feedback for truefalse, multichoice, and shortanswer type questions to the XML file. This allows students to get feedback based on which answer they chose.
To add feedback for an answer, you incorporate it into the answer column after the answer text by adding [FEEDBACK] followed by the feedback text.
Example: “San Francisco is the capital of California [FEEDBACK] Please review chapter 5”

Feedback is automatically exported if it is present, so there is no need to do anything further.
Export to XML
To export questions from (QB)² in an XML format ready for uploading to Moodle:
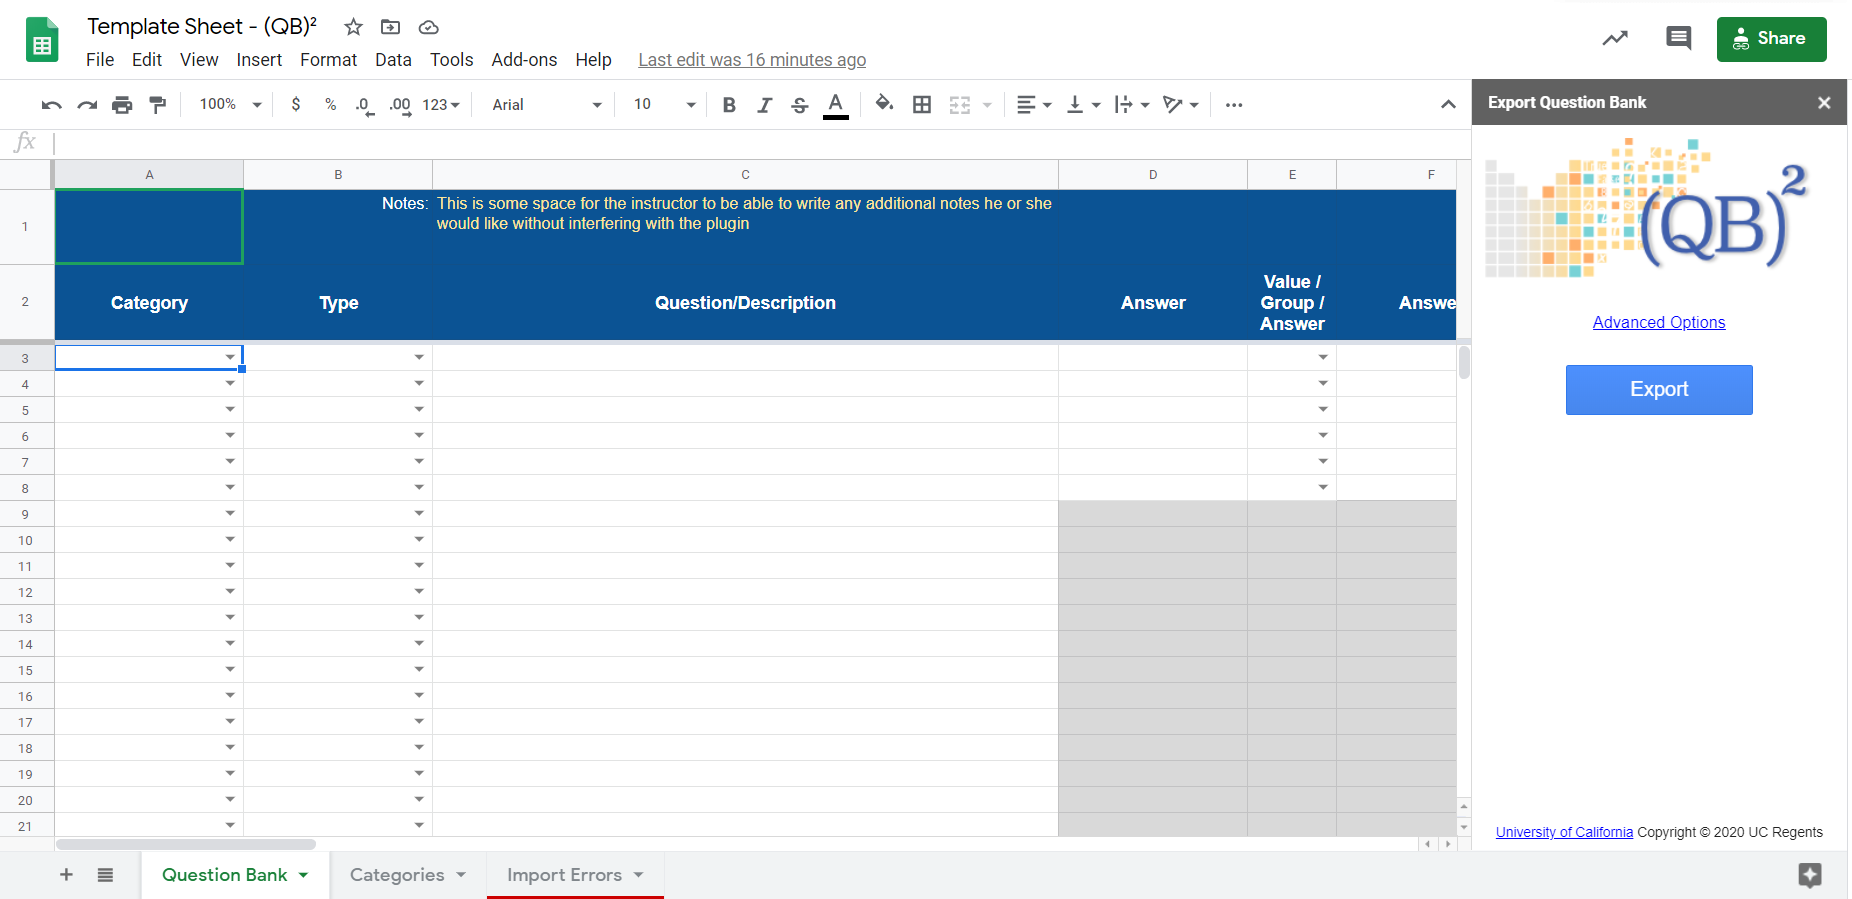
Go to "Add-ons > (QB)² - Question Bank Quick Builder > Export to XML" to open the sidebar.
Make sure the Question Bank sheet is the sheet you are viewing.
If desired, click “Advanced Options.”
Here, you can disable the default setting of shuffling the order of answer choices within Moodle.
Once the spreadsheet is set up correctly based on documentation and all questions are ready, click “Export" to download a copy of the XML file, and import into Moodle!
When you export, an XML file is saved to the same folder the spreadsheet is in. If you do not have permissions to this same folder, it will save the XML file to the root of your Google Drive. This may happen if someone shares their spreadsheet with you, and you attempt to export. To avoid confusion, it is recommended to get permissions to the same folder.
Import from XML
Go to "Add-ons > (QB)² - Question Bank Quick Builder > Import from XML" to open the sidebar. Make sure the Question Bank sheet is the sheet you are viewing. If desired, click "Advanced Options". The following options are available:
Import with HTML formatting
By default, import will remove all formatting from questions except for line breaks. Selecting this option causes imported questions to include HTML tags that will preserve formatting upon re-import into Moodle.
This option will generally make your questions harder to read and edit within the spreadsheet in exchange for greater fidelity upon re-adding these questions to Moodle.
This option is required if your questions already contain HTML or XML tags.
Import all XML files in a single folder
By default, import will read 1 XML file at a time. Selecting this option will allow you to select an entire folder instead. (QB)² will find all Moodle XML files in this folder to import.
When you are ready, click the Import button. A file picker will appear.
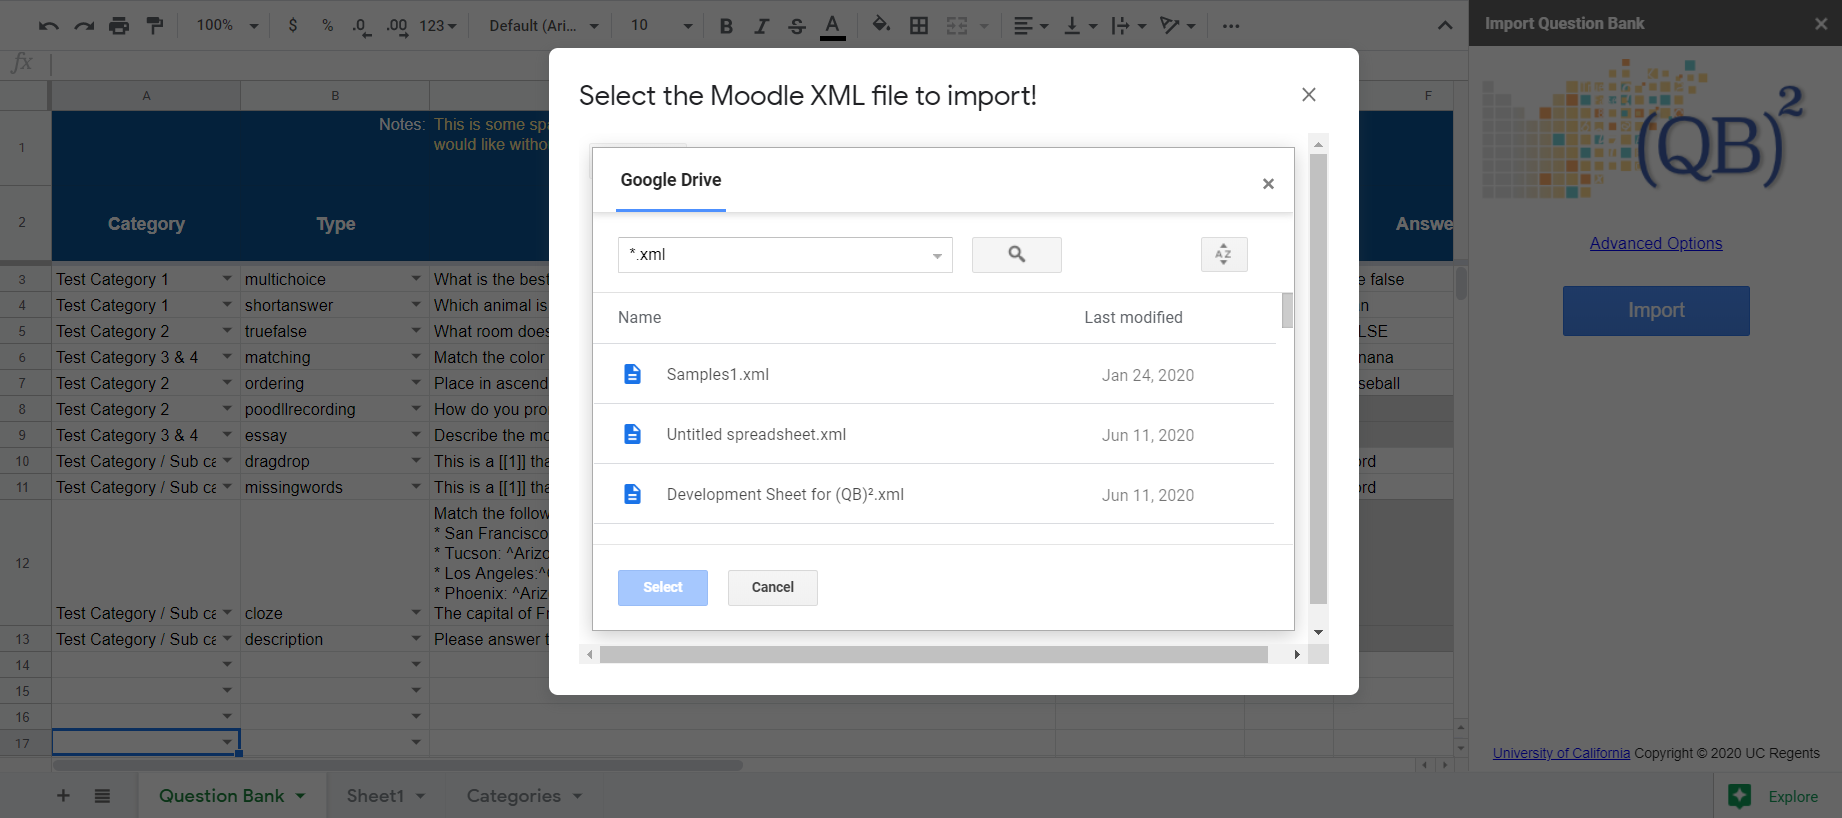
Select the desired file or folder to import.
Note: to chose a folder, click on it once and then choose Select. Do not double click it.
The questions will import into your active sheet, and new categories will be added to the Categories sheet. This may take awhile depending on the size of your files. When done, (QB)² will alert you to any error in a pop-up, as well as in a newly created Import Errors sheet.
Import Restrictions
There are a number of restrictions that may prevent certain questions or sheets from successfully importing. In all cases, (QB)² will alert you to any errors.
Sheet-level restrictions:
Due to Google restrictions, imported XML file must be smaller than 50 MB.
Due to Google restrictions, imported XML files may have limitations on the characters used. If an invalid character is detected, (QB)² will alert you to the file name and line number.
Question-level restrictions:
(QB)² will only import question types currently supported.
(QB)² supports only a subset of valid Cloze questions.
Cloze questions containing subquestions of types other than shortanswer and/or multichoice will not be imported.
Subquestions support only a single correct answer, without the possibility for partial credit.
Feedback is not supported within Cloze questions. The question will be imported, but feedback will not.
If a question contains more answer choices than supported by (QB)², all answers will be imported, but not all will be included upon re-export.
Other restrictions:
Media (videos, images, and audio) cannot be imported at this time. Questions containing this will be flagged with the file type that was present to remind users at a glance to add it within Moodle after exporting from (QB)².
Moodle Import
Import Steps
The following are steps on how to import the XML file to Moodle.
Navigate to an existing course
Go to Course Administration (this may also be called Admin Panel)
Under Question Bank, click Import
For file format, select Moodle XML format
Upload the XML file and Import
Navigate to the Categories tab, and you will see the newly generated categories with the number of questions belonging to each category
Navigate to the Questions tab to view/preview the individual questions.
Caveats
If you import without changing any settings under General on the import page, the questions will be automatically imported under the question categories for the course.
If you want the questions imported under question categories for a specific category, on the import page under General, unselect Get context from file.
If you want the questions imported to an already existing category, this category must be specified in the spreadsheet before import. Do not count on Import category option under General to do this for you.
For example, if you want your questions to be imported under Question categories for ‘Category: Humanities’ in the Default for Humanities category, make sure on the spreadsheet before exporting to XML file, to specify category “Default for Humanities” or “Default for Humanities / subcategory name”, and on the import page to unselect Get context from file before import.
Offline Spreadsheet
Google Sheets is great, but the main disadvantage it presents for writing question banks is that you will need an internet connection to use it. If you would like to write your questions offline, visit (QB)² - Writing Questions in Excel
Support
For any questions, bug reports, or suggestions for improvements please email us at support@humnet.ucla.edu
Git Repo: https://bitbucket.org/uclacdh/qb-2-question-bank-quick-builder
Credits
Developed By:
Lillian Hawasli, Instructional Programmer
Thomas Garbelotti, UCLA Humanities Instructional Technology Coordinator
Benjamin Niedzielski, Research & Instructional Technology Consultant
Amy Zhao, Student Programmer
Jakin Wang, Student Programmer
Rockford Mankini, Student Programmer
Logo/Art By:
Robert Farley, Research & Instructional Technology Consultant
Testing/Support:
Instructional Technology Group at Humanities Technology (HumTech), UCLA
Current Version
Release: Version 5.0.0
Released on: 04/20/2021
Copyright © 2021 The Regents of the University of California.